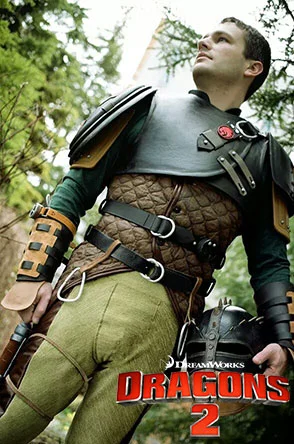
Under the Needle: Hiccup (How to Train Your Dragon 2)
written by Matt Castiglione (@CrftCastiglione)
I am Matt and this is how I Hiccupped.
He was chosen because he looks awesome, and I also happened to enjoy the movie and the cartoon. It was one of those things where you see it and you want it. No simple thing like not knowing how to shape foam, or sew, or having zero experience making patterns was going to stop me!
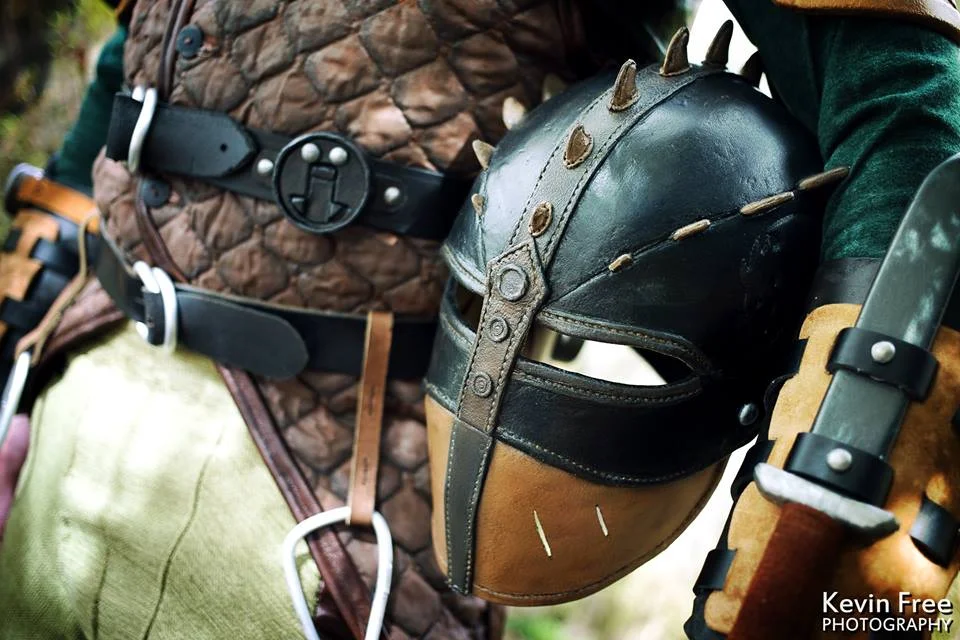
After I made the decision to cosplay I needed a place to start (aside from collecting references). I chose his helmet because to me that was the focal point and the coolest piece in my opinion. I wanted it to look the best so I chose to spend the most time on it. To make the pattern I took the screen shots I had and pasted them into Microsoft Publisher (the only program I had that was capable of making and manipulating shapes) and traced over them. Then removed the picture and cleaned up the lines and printed them out. I wasn’t worried about proportions too much because it was more of an exercise in getting to know the shapes and look of the piece and not the actual fit, after inspecting the details enough to draw it out I had a good idea of how it should look and be put together. For the physical pattern I borrowed what I learned from Kamui’s YouTube videos and saran wrapped my head and asked my wife to tape it up with masking tape. I marked out the basic shape of the main piece and started to cut, putting it on my head and checking the shape as I went. With the following pieces I cut out the rough shape on a paper towel and taped it to base. First the eye “mask” and then the lower face shield, and finally the bands in the back. When satisfied with the pattern I cut the helmet in half and flattened the pattern by separating it into three parts. I only use half of the original pattern and mirror it so both sides are the same.

The next step after I finished with the tape and paper towels was to make a test piece out of a sturdier poster board, again so I can get the feel of putting it together and make adjustments before I use the real thing (Worbla’s Finest Art). At this point I discovered that seeing the back of your head is hard, and taking a picture of the back of your head is also hard, so I bought a weird long neck wig head mannequin and that sped things up considerably, I no longer needed to go to the bathroom mirror every time a trimmed off sliver of paper.
Happy with the way my poster board helmet turned out I broke out the Worbla. Still learning from the example of Kamui I took two pieces of Worbla and one piece of craft foam I made the “Worbla Sandwich.”
(click to enlarge)
(click to enlarge)
Mine was a bit different, I transferred the pattern to all three pieces and cut the foam and one Worbla out the same size, the last Worbla piece I cut out 3/8in bigger. Laying the pieces out (pro tip: use a non-stick silicon baking mat/cookie sheet to heat the Worbla on) I folded over the edge of the oversized front piece and mushed it down on top of the back piece and used the barrel of a sharpie to smooth out the seam and then a rolling pin with some wax paper to make sure the Worbla stuck to the foam. I did not use the sandwich for the bands in the back of the helmet or the face shield in the front, I felt that they looked better thinner and only used two layers of Worbla to make those. At that time I was getting sucked into the YouTube research spiral and found a lot of people making plaster casts of their head to make their pieces on. I decided that I needed one and made a head cast with plaster bandages and Plaster o’ Paris. I ended getting some in my eyeball and had to hulk out of the mold as it was curing so it turned out quite horrible…but that’s a different story and I got a vaguely head shaped cast out of the results. I found out that Worbla did NOT stick to the plaster head cast so I was able to assemble and shape the helmet pieces on the plaster head itself.

Now for the details.
I drew out the side horns onto card stock and cut out a stencil, transferred it to 3-6 pieces of Worbla for each horn and heat gunned them together and stuck them on the seams. The middle set of horns I rough shaped out of Worbla scraps then used an Exacto knife to smooth out the shapes, occasionally heating and smoothing with the handle of the knife. With my fingernails I pinched along the edges to create the look of a seam. I took strips of Worbla and wrapped them around the edges of the eye mask and face guard to create seams and ran a leather stitch marker (wheel with spikes on it) along the warm Worbla to create the look of stitching. Laying down a few strips of Worbla down the center of the main helmet and the eye mask I then stuck on the horns and details, pressing a pen into a ball of Worbla for the decorations on the bridge of the nose. After that I added a cut out of the dragon symbol on each side of the head and it was ready for primer and paint! Leather has a texture so I didn’t want to make it perfectly smooth. I sanded down the surface of the helmet and got rid of the most offensive of nicks and bubbles and laid down a layer of gesso and sanded again. I only did this once because the surface of Worbla is pretty similar to rough grain leather and I wanted to keep that look. And for painting I bought an airbrush (but you can do this with a brush too! I painted everything but the helmet with brushes) and mostly used Folk Art satin black and satin brown along with some pearlescent white on the top and less black and more browns, oranges, and yellows on the face mask. After that the only thing it needed was some padding to adjust the fit and align the eye holes to that I could see.
(click to enlarge)
(click to enlarge)
(click to enlarge)
Wow, that was a lot on just one piece, but I told you it was the most important part to me.
The rest of the armor followed the same process; I made drawings in Publisher and on paper. Built a practice piece out of poster board, finished it off with the real deal of EVA foam floor mats or Worbla and added the details.
Moving down the body and from the inside out we get to the under suit/flight vest. I had wanted to make his vest out of individual scales but after spending A LOT OF TIME on figuring out the exact scale shape I would need I also realized that it would never look as clean and smooth as reptile/dragon scales which all meet each other without flaring out or flapping or bending up in any way. My Canadian friend and cosplayer Kasi Altair had suggested painting quilted fabric but all I had seen was giant diamond shaped patterns. After searching online I discovered a pattern that I decided would work perfectly with some shading and painting. I started with a muslin pattern and just made a long vest out of rectangular blocks of fabric and adjusted from there; angling the seams on the top of the shoulders, putting a dart on the back to get rid of the big pucker of fabric, and taking in a bit on the sides of the waist so it fit better under the belts. Then I moved to the real thing, using the practice piece as a pattern (and later the lining) I finished that up pretty quick and thought I could dye it a dark brown so all I had to do with paint was the shadows of each scale. The quilted fabric apparently had too much polyester to take the dye, the darkest I could get it turned out purple and the brownest I managed was a light orange or medium red. I went with the orange because I bought all that dye and needed to use it. Like I said it didn’t work that well so I had to paint EVERYTHING. Using a 1in synthetic brush I painted the shadows at the bottom of the scales and then went over everything else with the same satin brown I used on the helmet, making sure to paint over some of the black so there is a transition and no chance of me missing anything. After drying for a few days I added the pleather bias tape to the edges and belt loops, I thought that bringing the same material from the pants up to the torso would help the overall flow of the material. Plus it was in the reference.
The two toned pants were a bit more of a challenge because they were supposed to be snug and the materials I chose did not stretch. I took some spandex pants that were designed to wear under football gear (I think) and I traced out the pieces onto muslin for a test run, putting it on and pinning and adjusting as needed. When choosing the real materials I had a hard time finding the right green, something that was bright and strong, but still…rough looking. I found that upholstery fabric fit the requirements. It is strong and thick and just outside of every day notice that it doesn’t look like just regular material. And for the outside I used a pleather with a fleece lining, I thought that with the thicker types of material it will be less likely to wrinkle and would want to maintain its shape over the various complex curves of my legs and knees. I drew a line down the practice pants where I wanted the two fabrics to meet and measured the two halves and MADE SURE TO ADD NEW SEAM ALLOWANCES. I started big and gave myself 3/4in more than I needed so I could take it in slowly, leaving all the previous stiches on incase I needed to back up and loosen them at all. Which I did. A few times. I put the buttons for the pants along a reinforced seam between the pleather and couch fabric near my hip bone. The last pieces of the pants were some buttons for suspenders to keep them from falling down and stirrups to keep the legs from bunching up while walking.
Next was the …leather breastplate? This one was tricky because making a paper or fabric pattern doesn’t work that well when your final material is 1/2in thick and doesn’t stretch. I had lots of trouble getting the foam in the shape I wanted it to. I tried to make patterns and after the first attempt I learned to cut them around at least an inch bigger on every edge and slowly trim everything down. There were a few weak points where the vest joined, particularly under the arms and on the back under the collar where I had to cut out a long upside down “V” to fit the flying fin sleeve in. Adding a 1in wide and 1/4in thick rectangle of foam over the seam on the inside increased the strength immensely. Putting the collar on was a bit odd, the collar stay pattern I found online easily but I had to cut out the correct angle on the vest for the it to sit right and not push against my throat.

On the back of the chest armor (for the extendable fin sleeve I) rounded out a strip of floor mat and covered that in two layers of 1/8 craft foam and used a razor blade to slice an opening into the top. Mounted that on some foam that was bigger than the upside down “V” on the back of the armor and contact cemented the thing on, using hot glue to get the edges to it wouldn’t have a chance to pull up. At this time the vest construction was complete but the foam was still nice and neat. While the 1/2inch thickness is great for durability and cartoonish look it was also thick enough to keep its own shape, which did not look like leather shaped to someone’s body. I took the heat gun and worked the foam, using my hand to push out from the inside of the vest front and back, flaring out the arm holes to make it look like it’s been well used and broken in, and then just kneading and stretching any area that looked too straight and clean. For the fake seams on the edges of the vest I taped off 1/4in with masking tape and used a fiber sanding bit for my rotary tool and sanded down the inside edge of the tape to create a raised seam, then cleaned it up and rounded the edges after removing the tape. At first I molded some rivets out of Worbla and used those to attach the leather belts and buckles by bending over the tail on the inside of the vest. I later had to tear out all the rivets because I decided to rebuild the chest piece completely (I had an extra few days before the con) and then used wooden pegs with rounded edges that I hot glued in on the new armor. Speaking of belts and buckles, I forgot to say that the belts were found at thrift stores and I cold forged (beat with a hammer) the D-rings and clasps out of aluminum round stock and made the red dragon symbol from Worbla. Paint was the same as the black on the helmet; Folk Art acrylic pearlescent white, satin black, and satin brown. I took a 1.5in brush and went to town, painting a base coat of black covering 75% of the vest and then covered the rest with brown then back over that with black and more brown and then mixed brown and black then some pearlescent white (the stuff is super thin so it doesn’t show much). Then more black till I remembered I needed to paint other pieces, so I stopped.
The shoulders were constructed the same way; I heated up the foam and dished out the ovals by pulling out the edges and molding it over my knee. The red monster face is painted craft foam and everything was contact cemented together. I cut slits for the leather straps and hot glued plastic clips at the top to attach to the breastplate and to the middle to attach the bicep armor. After everything was dry I added leather lacing and leather bands. I like to think that if you use real leather in addition to paint effects it gives the impression that the other pieces could be leather too.
The bicep armor was pretty easy, there was a flat surface and one simple curve. I started with the craft foam and added a second layer around the perimeter to raise up the sides and sandwiched it up with two pieces of Worbla and then added strips of Worbla for the panels. Then it was finished with rivets and the leather stitch marking tool. It was then heated up and shaped over a glass jar wrapped in was paper. I had a harder time getting the right colors for these lighter leather pieces. I wanted them to match the hand guards and the real leather on the bracers. The colors I used on this included: tan, orange, brown, satin brown, black, red and yellow. Sealing with a clear coat and hot gluing the matching clip finished the two bicep armor pieces.
The bracers were cut from the EVA foam mats in one piece, shaped with a heat gun, and then rotary tooled down quite a bit using a sanding drum and the fiber brillo pad type sander, also taking off any of the visible texture on the underside. I did use a razor blade to slice into the line where the hand guard meets the bracer to give the illusion that it is a separate piece. I also sanded out some grooves to show the leather straps had dug into the leather over time. I used real leather for the pieces on top of the bracers and cut slots into them with a razor blade for the leather straps that hold it on my arm. I was having trouble keeping the leather in place while fastening the straps with the other hand so I drilled some holes and used Worbla rivets to hold everything together, hiding the rivets underneath the strapping. The dagger and compass were modeled out of Worbla scraps that I heated up and mushed together, using a rolling pin to flatten out when necessary. I used a clear plastic pop bottle for the compass glass, holding it together with tiny Worbla frames.

The sword was hastily carved out of balsa wood. (wood so light it feels fake) WEAR A MASK WHEN SANDING BALSA it’s so light it just hangs in the air forever! Or you could stand in front of a fan. Painted this with a mix of grey and pearlescent white and wrapped the handle with leather lacing/cord. I made the sword holster out of Worbla and the straps out of pleather. I knew that with all the walking and bumping that would happen at conventions that it would want to slide down so I added some hooks on the inside of my leg and the back side of the strap and a button underneath the base of the holster and glued a string loop to hook the button.
For some reason the boots have gotten just as much or even more complements than my helmet (my favorite part) or even the entire costume as a whole piece! They are NOT covers and are made almost completely out of EVA foam mats, the only things not foam are leather soles and accents. The original thought was that I could wear a shoe inside them but that eventually was not a possibility without me restarting completely. I started with a lot of sketches comparing a real foot to the reference. The profile of a real shoe is completely different than the cartoon Hiccup: in real life the ankle is the smallest part and the length of the front of the shoe is about twice the width of the ankle, but the cartoon ankle is twice the size of the toe or more! My entire boot is around 15in and the toe is only the last 3-4 inches! I tried to be smart and make a poster board boot but it really didn’t work that well and I really overthought the whole process. If I skip all the time wasted it boils down to a few simple sounding things. I traced and cut out an outline of my foot and transferred that to the foam. I cut out 5 pieces about 1/2in larger than the outline and glued them together stacked up. (5 for each foot) Took them to the bench top belt sander and smoothed down all the edges and finalized the shape. (When sanding such a soft material on a harsh 80 grit belt you have to be careful to keep it level, if you tilt it incorrectly you might not feel the sander eat away too much material!) I got the sides of the boots (at this time they were only large rectangles close to the size I wanted) glued together on a seam above the heel and laid a strip of 1/4in foam as reinforcement. Slathered on the contact cement on the sole and sides and clamped it all together using scrap foam to protect the surface of the boots from the clamps. With that dry I could step into them and figure out how to close them up. (It was at this point I realized my shoes wouldn’t fit) I really don’t have a solid method of how I finalized the shape. I had a full sized profile of the boot on paper so I just cut small pieces off the two sides until they matched the drawing and also fit together without puling on other parts of the boot too much. After I closed the top front up I cut pieces to match the sections I had left to fill. I honestly didn’t really like how the pieces came together, there were 3 or 4 seams in the area that gets the most abuse and flex and two of those seams ended up splitting (one on each boot) I tried to hide all the seams and weird looking pieces under a toe of grey leather and all the leather cord, and based on the comments about the boots it must have worked. I walked around the house for quite a while feeling all special since I was almost 6’ tall for once in my life (5’8” with regular shoes on) and noticed that it got a bit toasty with my feet encased in solid foam…so I took a drill with a 1/2in paddle bit and drilled out a few holes in the bottom of the shoe, hoping to encourage some airflow. It didn’t work that well. I topped the boots off with a pleather cuff hot glued in place and bottomed it out with some leather soles to protect it from all the concrete, grating, and escalator steps they may be walking over. I wear custom insoles in my regular shoes so I threw them into the boots and they made them actually comfortable. For the few hours anyways. Walking around some more still proved awkward, with such a big ankle space they just flopped around and twisted and ran into stuff when trying to avoid them. I had some soft thick foam laying around so I took a block and shoved it down into the boot at my ankle and that held it in place perfectly, so I stitched up a cover with a strap for easy removal and called it almost done. I was still walking like a claymation abominable snowman. So I compared the sole of my foam boots with some of my own work boots. I noticed that the heel curved up and the toe also was bent up from the normal walking motion. In my foam boots the sole was so thick that it would never be able to develop that curve. So I took off the leather soles and belt sanded the heel and toe curve into each boot and that made an amazing difference. Before I was going from a hard corner on the heel to a flat surface to another hard corner on the toe which was forcing my legs to make up for that with an awkward stride. Adding the two curves made the transitions much much smoother and more natural, and other that having gigantic shoes on it felt almost normal.
And that’s it! Well, that’s all of the successful stuff. What I didn’t include was how many times I failed, and since this was my first full-fledged completely constructed cosplay, my first time using Worbla, first time sewing, patterning, cobbling, and painting I failed a LOT. The only thing I had done before was wood carving, gluing and sanding. Not including the patterns I made or the poster board pieces, I had to make 4 different breast plates alone! The whole project from decision to convention took over 4 months and most of that time was research, drawing, and making mistakes. I spent a lot of time on YouTube, especially when learning how to sew. If I couldn’t find a cosplayer who had made something similar I looked at other sewers and seamstresses. The best tutorial I found for making bias tape (pleather trim and belt loops) was from a woman who made potholders and hot pads. The most detailed tutorial I found for sewing the bias tape was a dress maker showing the different options on finishing the hems on a dress.
If you have any questions or want me to elaborate on certain pieces you can find me on Face Book at Craft.Castiglione or email me at Craft.Castiglione@gmail.com.
Final words: Don’t limit your research to your specific application. When learning how to use a new material, focus on the material itself rather than the end result. Not only can you find techniques that apply to your current goals, you will also get ideas you may be able to apply from other types of crafters and makers.
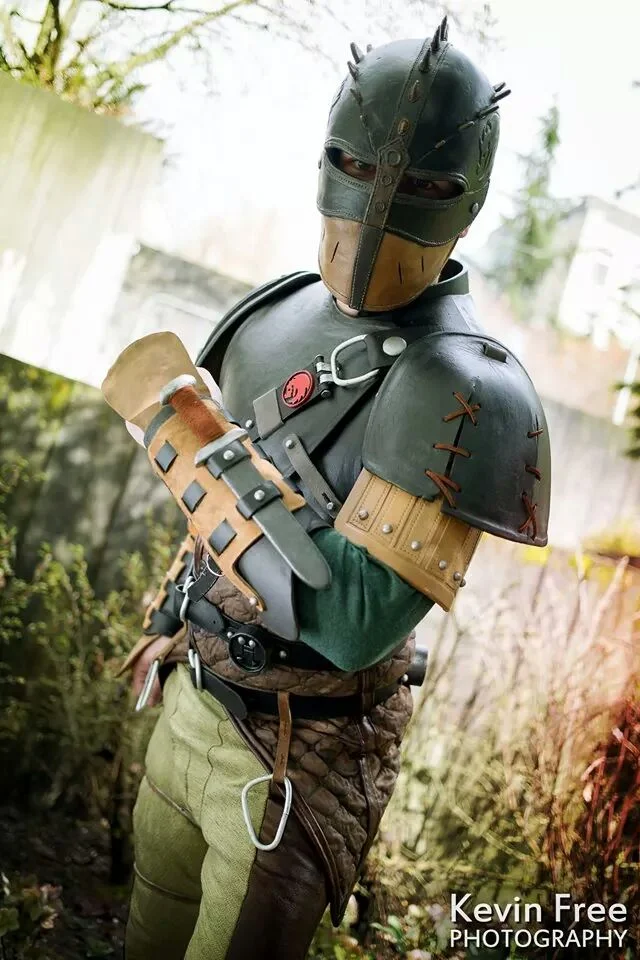
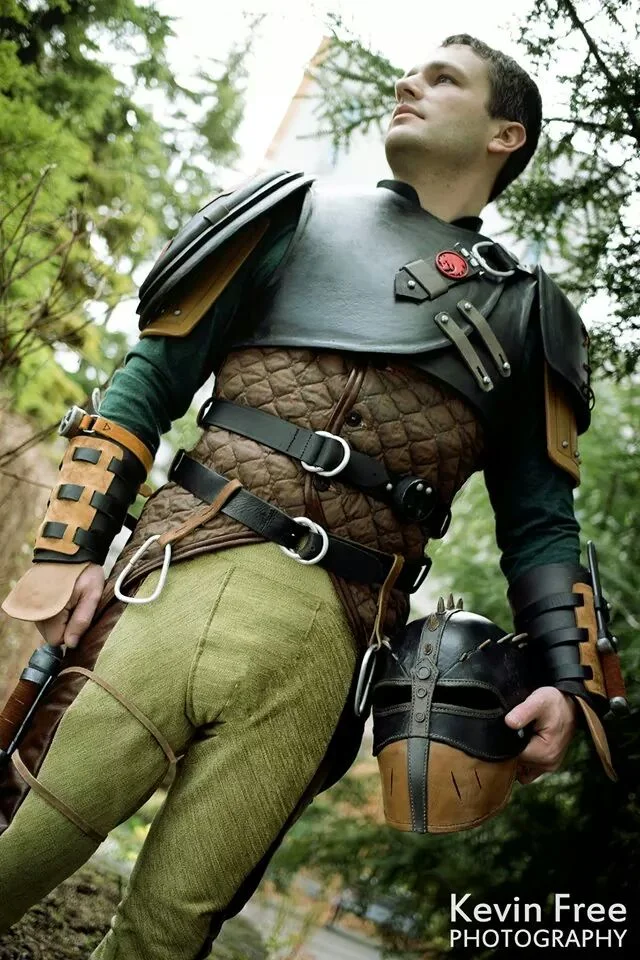
Final Form: photo credits
more Hiccup... click to enlarge (photo credits: Kevin Free Photography)


Matt is an accomplished cosplayer, first met him at a local con in Bremerton and approached him about doing this piece! Make sure to check out his Facebook Page and give him a like for more of his awesome work! Guy is as lifted of a geek as they get.