Under the Needle: Delsin Rowe

written by Justin Prince (@prince_justin)
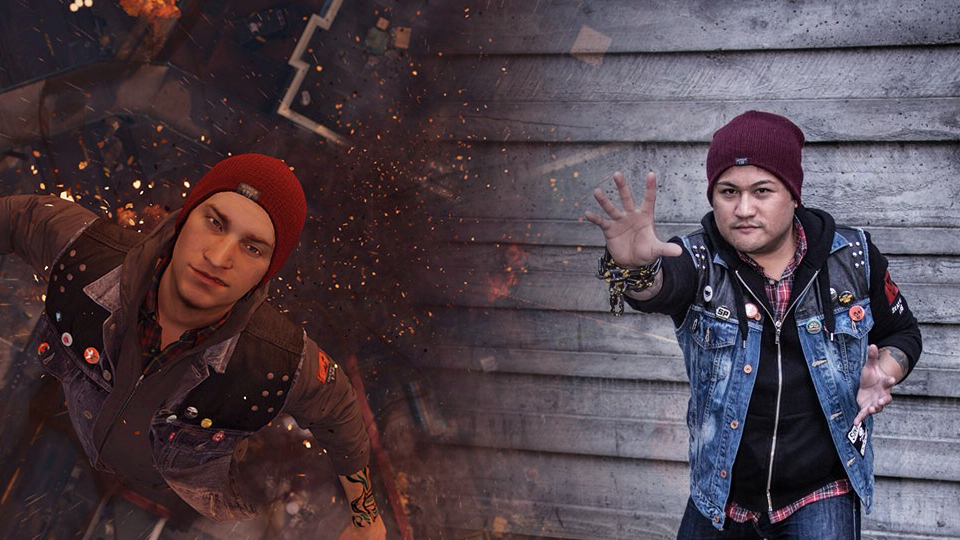
Hey guys! I cosplay too! I'm sure our g33kful following knows and loves all of Riri's work, but my partner isn't the only one with a cosplay bone (that sounds a bit off). In fact I credit myself for getting her into cosplay, you are all welcome for that. ANYWAY! Before I get too far off base, I better get to the meat and potatoes of this whole thing. When I first saw trailers for inFAMOUS: Second Son I was immediately in love with the whole package! Being a fan of previous inFamous games I've always wanted to cosplay a character but I could never really see myself as Cole... not that I didn't like the guy... I just didn't want t shave my head again. Enter Delsin, different from Cole in every way, I knew I had to make that costume. To be honest, the costume I am showing off (and the technique I am using) is my second attempt at Delsin. For PAX Prime here in Seattle, I made a "not-so-game-accurate" costume for the character, mostly because I wanted to be able to wear it (at this point it was about 7 months away from the game's release). Armed with blurry trailers I free hand painted it on (a bit too thick too) and while it wasn't perfect, it did garner much praise from every Sucker Punch employee I met along the way at PAX.
UGH! I cringe at how shoddily I did the pattern on this vest... first worn at PAX PRIME 2013
Let's fast forward a few months, for Emerald City Comicon (this past March) I was determined to make a game accurate version of Delsin to show off. I figured that the default "neutral" alignment would be most recognizable, but I did toy with the idea of making the Collector's Edition vest or the Cole's Legacy jacket. Settling on the default vest, I wanted to make sure it looked MUCH better than my PAX 2013 costume. At this time, it was much easier to find resources online, I found a decent image of the crow star logo and used that as my base. First step was to look at gameplay footage and get the size of the logo as close to the character model as possible. From the initial trailers to the final game, the logo on Delsin's back got bigger and spanned a wider area of the vest, marking the vest with white seamstress chalk I was able to measure the width of the piece.
I printed the logo at my local Fed Ex Office and carefully cut the pattern out (with an xacto knife) from a lightweight card stock. PRO TIP: If you are printing at a Fed Ex Office or Kinko's (do some still have that branding?) process your image in black and white, this will cut down the cost of the printing and since you don't need the colors for this cut-out, why pay more right? Finding the images can be a pain so I will link a little kit at the bottom with a zip file you can download with my assets.
Figuring out what paint to use is just as important. You will need two products to make the perfect paint. An acrylic paint is your best bet to get the rich color and promote it to last much longer, along with that you will need a matte textile medium to promote a lower viscosity for the paint, if your paint is too thick you can expect it to chip/flake off when you simply fold or bend where the paint is applied. I wasn't too meticulous with the measuring but I mixed about a 2:1 ratio of paint:medium.

the paint, these brands rock!
My next step was the black part on Delsin's shoulders; first I'd use masking tape to cover all parts that aren't black and then I would paint it with black paint, simple. When the shoulders have dried, you're ready to get to work on the logo on the back. I covered the entire back area I plan to paint with masking tape, this proved to be a LONG process but ended up being the cheapest option around to make a makeshift stencil. Placing the cut-out logo on the masking tape I traced it directly on my makeshift stencil. The next step requires a VERY light touch, take your trust xacto knife and cut the pattern out of the masking tape. I cannot stress enough how important a light touch is here, I applied a bit too much pressure on some parts and ended up cutting through the denim (oops) while it was easy enough to fix with an iron on mending strip, it's still a pain in the ass to deal with.

the masking tape stencil, ready to xacto the design out
final product for true hero
As far as applying it, I used a paint roller. It's a good idea to buy multiple rollers to ensure that you use only that roller for the corresponding color. You can use a paint brush but the application is too inconsistent and the likelihood that you'll apply the layer too thick is higher, about two or three light coats should be sufficient for the back. Now the technique for painting over the stencil on is up to you but in the interest of helping, I'll offer some advice. For those that didn't notice, I am doing three Delsin vests: neutral, true hero, and infamous.

a handy image showing the design placement for true hero (left), neutral (middle) and infamous (right)
Neutral was the easiest to do, the pattern was pretty straight forward and the only extra step I did was apply masking tape over the dividing line between the two halves. In the interest of time (and to save tape) I simply cover the rest of the half with a newspaper and taped it to the dividing masking tape. Paint one half, let it dry, then repeat for the other side. When the paint is fully dried, remove the masking tape completely (this part was a pain as well) and that's it!

taking Delsin to Emerald City Comicon
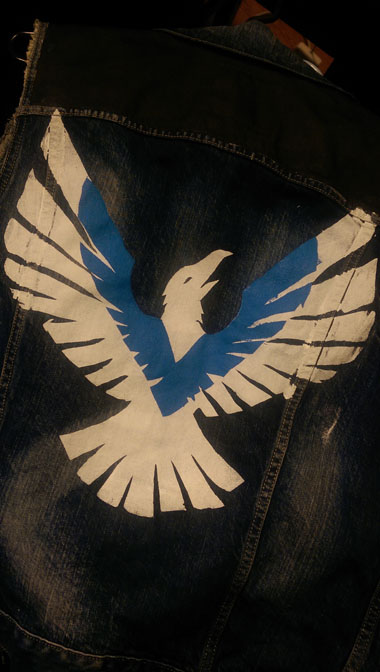
For true hero and infamous the design is much more intricate than neutral. I created two files for the true hero and I am planning to use three for infamous. First the masking tape stencil (repeating aforementioned steps), the true hero looks like a white bird with blue accents, I painted the white part first then when it dried I created another stencil and painted the blue part. For evil Delsin's infamous vest, this will require three layers. The easiest way to explain the layers is to have a stencil for each layer/color and to work from the bottom to the top. The rest is all based on your skill but I think I got you far enough that the rest should be self-explanatory.

painting the blue layer to the true hero Delsin vest
Accessories are key if you want to make it look good! The hat and pins are courtesy of Sucker Punch but finding a maroon knit cap shouldn't be too hard, the only down side is you'll have to make the "Seattle 138" tag for the hat... or don't, it's up to you how accurate you want to be. The studs on the vest were bought at Hot Topic and the patch on the front-left side of the vest is sewn on and utilizing the stencil technique for the back, I created the Sin & Tonic/Skull n' Cross bones/Salmon Bay patch.
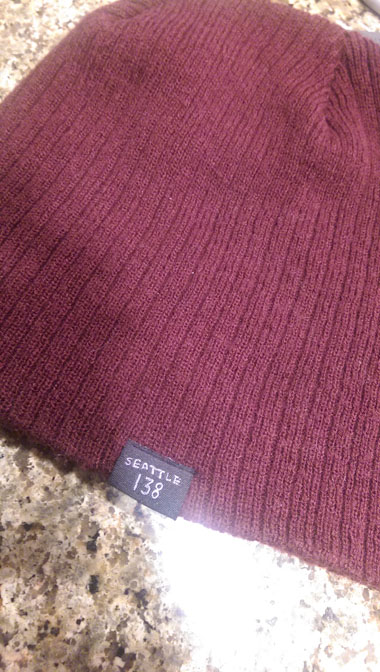
the hat
the shirt

sin & tonic / Salmon Bay

on the arm of the hoodie
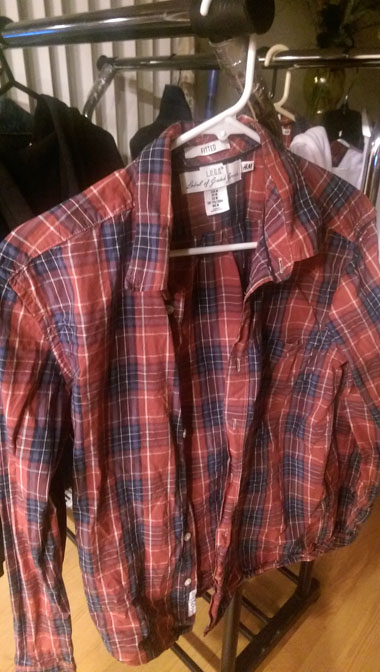
As far as the rest of the outfit is concerned, Delsin's hoodie is relatively easy to find. He wears black for neutral, white for true hero, and red for infamous. The only additional work you need to do (again this is in the interest of being accurate) is to create the skull patch and the Seattle 138 patch. Again, I utilized the masking tape stencil technique. PRO TIP: I used mending patches for the hoodie since I was too lazy to stitch it on, mending patches can be bought at your local fabric store and are constructed of a thick canvas with an iron-on backing. The shirt was bought at H&M, maybe you can still find it but when I bout them they were already discounted so they may be gone by now. You can get the shirt elsewhere but remember the shirt must be a dark red plain with very little white on it, my first attempt at cosplaying Delsin I just used a shirt I owned which worked, but wasn't really accurate to the in-game model.
Overall, I had a blast making these vests and I hope you can use this article to cosplay Delsin too! Sucker Punch gave us such a great game and it inspired me to create these vests, first and foremost I want to thank the whole inFAMOUS team for giving this to us. Cheers and get lifted.
For some good quality images for Neutral, True Hero, and Infamous Delsin's vest, here is a handy zip file with high quality images courtesy of Sucker Punch (CLICK HERE TO DOWNLOAD).

Photo by Benito "Romero" Vasquez